I’ve been wanting to do a more proper photoshoot with my 1850 mourning dress (click link to see the construction post) since wearing it for the first time in Bath last year. Although I have pictures of the event, the dress just is so perfect for a moody Victorian shoot. The breakfast/rowing pictures of Bath are amazing memories, but don’t fully fit the heavy mourning vibe.
Yesterday, I finally managed to go out, and had my partner be ‘living tripod’ (keep clicking the shutter button while I pose). The late afternoon sunlight was quite nice for pictures, and the winter foresty vibe goes really well with the full black dress. I had a lot of fun looking through these and editing, so they deserve their own post! The undersleeves and mourning veil are antiques, everything else I made. I also took out the sontag (shawl/wrap garment) I crocheted a couple of years ago, and included some shots with that.
The first step towards making an 1850’s ballgown was to create a new crinoline cage. I have an 1860’s one, but that one is elliptical and rather large. Although fun, it’s not super convenient to dance in, especially if you’re dancing with another lady also wearing one (yes, I’m speaking from experience).
So for the Victorian ball, I’m aiming for an earlier, rounder, and slightly smaller type of hoop. I decided to use the TV 1858 crinoline cage pattern, as that was what I had on hand.
The main construction is to first make the bag for the bottom, and sew the channels in place while keeping the front top open. Then next you cut all the boning, put the bottom boning in the channels in the bag, and cut the boning casing for the top. You put the bones in the casing for the top, and then make the vertical tapes. Finally, you slide the boning through the tapes, and attach the bones to themselves on the ends to form hoops.
For this project, I decided to go as easy as I could make it on myself material wise. The bag is white cotton, and the bottom hoops are 11mm steel. Since we cannot get bone casing wide enough for 11mm steels, I got 6mm steel for the top hoops, as well as bone casing meant for bra underwires.
They’re a very tight fit, but they fit, and this was easier than sewing my own boning casing.
For the vertical ribbons, I got curtain tape, which actually has little built in ‘loops’ which fit the 6mm boning in casing exactly. This means no sewing tapes, and because they’re quite tight they don’t really slide on their own, which means I didn’t even bother sewing the tapes to the bone casing except on the ends of hoop 1 and 2, which are open.
To attach the hoop ends to each-other, I opted to just use ductape. It’s not the prettiest, and doesn’t look very historical, but so far it seems to hold up fine. Again, this was what I had on hand, and was by far the easiest option, so I call that a win!
The final step is the top belt, but at this point I first needed to lengthen my tapes by a good bit. I don’t consider myself very tall, for a Dutch women I’m below average, but at 1,67m TV patterns tend to be short on me, and I needed almost 10cm at the top here as well. If you’re taller than me, I would perhaps even recommend shifting the height of the hoops as well. For me, just extending the top a bit worked fine. I haven’t made a proper ‘belt’ yet, but for now the ribbon tied in place will work. I will probably try it on when next wearing a corset for fitting, and sew on hooks to close it that way.
So the first project of 2024 is done, and that opens the door to start the actual dress!
I also might make another petticoat at some point, as my 1840’s petticoat only just reaches the top of the hoop bag, so is a bit short. For my velvet 1860’s dress I used a black petticoat, but that won’t work with the white silk, so a proper white one will be necessary.
In June of this year, I had the opportunity to volunteer as ‘set dressing’ for the Kasteelfeesten at Castle D’Ursel. Held once every two years, this is a historical event with some reenactment, activities for families and general fun in the theme of a historical year of the family which inhibited the castle at that time.
This was my first year attending as volunteer, and our job was basically to scroll around looking fashionably historical, enjoy the day, and participate in some small reenactments. The year it was set in was 1910, and that meant I did need a new dress!
For the day outfit, I scrolled through De Gracieuse of 1910, and settled on this dotted dress:
The original inspiration
First step was fabric! I settled on buying a dotted viscose. I knew I wanted a very drapey fabric for the sleek 1910 look, and although the original was meant to be silk or wool, even if I’d found a suitable silk or wool with dots, it’d probably been out of budget. Cotton dots are the easiest to find, but that would most likely be too stiff for what I wanted. I settled on viscose, as that still feels natural, and I actually had a chance of finding a suitably sized dark dot on white background (turns out most fabrics are white dot on color background) while also finding the exact same hand of fabric in a solid matching the dots.
The dotted fabric in the cutting stage
The dark blue fabric in the hemming stage
My dots ended up being dark blue, not so much as conscious choice, but because that was what I could find online.
For the skirt, I made a rough mock-up based on the pattern with the De Gracieuse picture (which for the skirt is a tiny picture). I drafted a version with a narrower bottom panel, as in the picture. I only pinned it on, but it gave quite a ‘balloon effect’, with the wider top part standing out. Although my drapier fabric and proper sewing would have reduced this, I was scared that this particular design element would still end up looking a bit odd. The original image shows no ‘blooming’ of the wider part of the fabric, and I suspect this will only happen if the dotted fabric is very light, and perhaps even the darker fabric a bit heavier to pull it down.
The rough skirt pattern from De Gracieuse
I didn’t really have time to experiment, so in the end I just decided to cut the fabric more ‘as normal’ with a contrast band at the bottom, but no narrowing of the skirt. Not as highly fashionable perhaps, but still suitable for 1910.
For the top part, I first traced the pattern from De Gracieuse to figure out the pattern lines. The contrast is actually in one piece, which is quite a cool feature.
[picture pattern]
I then took my Wearing History Edwardian blouse pattern (which I’d made before), and applied the contrast fabric piece to that, basically applying the ‘idea’ of the pattern to one that I knew would fit me. This saved a good deal of scaling up and fitting effort. The contrast band is used to gather the main blouse fabric. The point in which it’s sewn in was a bit fiddly, but it looks quite nice when finished. For the sleeves, I went simple, and just made a contrast cuff to the original blouse sleeves. I ended up leaving the bottom of the blouse wide and open, to allow for easier fitting. The blouse closes in the back with snaps.
As I chose to make this dress a blouse/skirt combination (rather than for instance a full dress with lined bodice and skirt attached), I did want to pretty up the waistband a bit. So I made a belt to cover the waistband of the skirt, following the original inspiration in general.
The final step was headwear! As I had so little time, I opted to re-use my 18th century bergere as 1910’s hat. The main difference is that a bergere has a very shallow crown, while 1910’s hats have bigger and deeper ones. To hide this, I followed my friend Birthe’s example and just pinned a whole bunch of tulle on top of the hat. This was left-over bridal tule from my sister in law’s wedding dress, and it worked perfectly to get the right look!
A small last-minute addition was a gold/white ribbon for the suffragette demonstration we were to take part in (yellow-white were the Dutch suffragette colors), and an antique collar which happened to fit over the neckline very nicely.
The day itself turned out to be quite warm, so I was very happy that Julia (Empress of Buttons) was so kind as to lend me a parasol for the much needed shade.
I strolled around, drank a lot of water, danced a bit, marched in a suffragette demonstration, rode some antique cars, took pictures, and in general had an amazing time with a wonderful group of people.
People who know me, know I have a bit of a penchant for black clothes. It’s not super obvious in my costuming wardrobe, but it’s also not a coincidence that my first big historical project was a black velvet ball gown.
One of my favorite black gowns is this ca 1850 mourning gown in the Amsterdam museum:
It’s not a flashy or fancy gown, as a mourning gown usually is not. After all, it’s about restraint and lack of ornament. But in it’s relative simplicity, it’s a very clever design. The sheer wool fabric means there’s a depth to the skirt tiers, and the little pleats in the bodice draw the eye in to strengthen the illusion of a smaller waist.
A dress like this would’ve been worn on top of something, obviously the neckline is way too low to not be filled in. The wide sleeves, too, hint at under sleeves being suitable. There’s a collection of images of similar dresses in fashion plates and photographs to give some idea. I’m not sure if a mourning gown would ever have been worn with black under-things, but generally these were usually white.
Quite a number of years ago I stumbled on a very sheer black fabric at a market, for I think about 2,00 per metre. The seller wasn’t sure if it was cotton or viscose, but I figured it was natural enough. It immediately reminded me of this dress, and so I got the whole bolt. It’s not wool as in the original, but finding affordable, quality wool that sheer was always going to be very tricky anyway.
The project got shelved for quite a while, as I never really had an occasion for it. Until the Prior Attire Victorian ball this year, which was themed 1840’s. Although dated 1850-55, this style could work in 1849 as well potentially, so I called it good enough a reason to finally make this dress and use some of my stash fabric!
The bodice is made of 1 layer of the black, mounted on a white cotton lining. This way, the white shines through and not my corset. It also allows the pleats to pop, as you see it when the fabric is doubled.
I pinned all the tiny pleats in place, and sewed them down by hand to get the maximal control. At the center front, the black layer is just folded in around the white lining to finish the edges.
Pinning pleatsPleats sewn in place.
The bottom edge of the bodice is finished with a tiny bit of piping. The sleeves I left unlined. The bodice closes in the back with hooks and bars.
The center back has a bone for support of the closuresThe finished bodicePiping at the bottom
With the bodice done, it was time to start on the skirt! The base layer is a big rectangle of the black fabric. For the tiers, I decided to seam a ‘tube’ of fabric on a bit of black silk piping. The original dress has a little edge on top of the tier at the bottom instead, but my method somehow made more sense to me. This way, each tier has 2 layers of fabric and the seam is nicely hidden in the piping at the top. The silk has just a tiny bit more shine than the base fabric for some nice detailing.
Cutting fabric for the skirtSilk piping to finish the seam on the tiersSewing in the piping
Each tier gets slightly smaller when you get to the top. The final widths took some drawing lines on the original image to make sure I’d get the right proportions, but worked out in the end.
Laying out the tiers to check proportionsThe finished tiers before being sewn on the base
The top of the skirt is pleated with 3 rows of gathering. I debated doing cartridge pleats, but the original doesn’t have it and at this point time until the event was getting a bit tighter, so this was the more practical option. The skirt was hemmed with a bit of heavier black cotton as facing. Hopefully, this will also protect the hem a bit, as the fabric is quite delicate by itself.
Then the main dress was done! I’d planned to wear this with antique undersleeves and chemisette underneath. However, when trying it on I found that my antique chemisettes were all too short, ending above the split in the bodice. So in the end, I made myself a new white cotton chemisette, decorated with some simple strips of lace. I can close the slit at the top with a pin, which also serves to hold the antique lace collor I planned to wear with it in place.
And then she was wearable! I had a black bonnet base lying around which I decorated with some bits of the black cotton fabric to add just a little bit of interest. To fluff the skirts, I’m wearing my 1830’s corded petticoat, plus two extra petticoats for poof.
I re-starched them for the event, and they came out very crispy indeed. They all stood up on their own before ironing, and they make a lovely sound when moving.
The dress was worn to the day-after event of the Victorian ball in Bath hosted by Izabella from Prior Attire. It was a great dress for a slightly overcast spring day, not too hot & cold, and no worries of the rain ruining the fabric. My only take-away is to see if I can somehow combat the gaping of the bodice a bit. I tend to slouch, which is very un-Victorian of me, and it makes the deep neckline a bit loose.
These are all the pictures I have for now. I’m still hoping to do a proper photoshoot with this dress, hopefully also with the (very dramatic) antique mourning veil I have.
After finishing the skirt of the 1890’s ensemble, it was time for the bodice! I used TV493 as a base, and started with a cotton mock-up as I usually do. The advantate is that I can usually re-use the mock-up as flat-lining fabric. After that, I could cut the main fabric and the organza overlay. I’m using the black silk organza I also used for my green 1890s ensemble, as I still have a lot of that left.
For the back, I cut a wider piece of organza and pleated it in place. It was then stitched down in a lot of different spots to keep the pleats somewhat in place.
For the front, I first made an overlay of the main fabric. The lining closes center-front, but this layer will go on top to close to the side. The picture below shows the fitting at this stage, before the front was covered. (Also, yes, this is still the same color fabric. It tends to photograph pink in day-light and orange in yellow lamp-light.)
I started on the overlay for the front, but hated the first version (so much I even forgot to take a picture of it). So while I was thinking on how to fix that, I made up the sleeves. These are the same as my 1890’s green day bodice, and are adapted from the Victorian Dressmaker book. There’s a fitted lining inside, which helps the sleeves stay in place. I didn’t use any tarlatan in these, as this fabric has a lot of body on its own already. The sleeves won’t be covered with the black organza, following the inspiration dress.
After making the sleeves, I got back to the front overlay. I cut a new organza piece, and this time the pleats collaborated with me. This was a pretty organic process, and I didn’t have a very specific result in mind. I ended up adding some velvet ribbon to create some more contrast. On the left is the first pinned version. On the right the fitting. As my dummy is slightly smaller than me, I wanted to make sure the overlay wouldn’t be wonky on the body.
After some more stitching down of organza pleats in strategic places, I finished the bottom edges. The front and back+sides are finished separately, and only stitched together after finishing the bottom. This way, if I ever need to take out the bodice, it’ll be much easier to just let out these seams. When this was done, I could also set the sleeves, and it was starting to look like a bodice!
Final steps were the cuffs, collar, and closures. The cuffs and collar are decorated with a little strip of pleated organza. Mostly because the sleeves were cut a little too short and needed a little length, but also because it looks good.
The closures were the final step. The lining closes center front with hooks and bars, and is boned. The front overlay closes with hooks and bars as well. Below is a little collage of how it works. The collar overlaps and is opened first. Then the side of the front panel, and then the cotton lining underneath. The collar is only attached to the outer fabric in the front.
And then she was done! I was originally going to add the finished full outfit pictures to this post, but it has gotten quite long already. As I really love how the images came out from our little shoot, I’ll leave those for their own post, coming soon!
I did very little historical sewing over the summer, needing a bit of a break from everything after a very busy first half of the year.
However, with autumn starting, and no immediate event deadlines looming, I figured it was time to start something new. I wanted this project to firstly be relatively easy, and secondly to be made from stash materials. I’ve collected quite a bit of fabric by now, and using some of that is good. The advantage of not sewing for an event is much more flexibility to fit the project to the fabric, rather than fit fabric to the project.
I settled on using a shot poly taffeta. It’s not silk, but looks very close to the real thing. It’s a shot mix between a magenta pink and salmon orange. That actually doesn’t sound great (as someone who neither loves pink nor orange), but it’s quite pretty in person. It’s also very difficult to photograph correctly, it tends to either show up as pink, or as orange.
My main difficulty for this fabric is that it’s a lot on it’s own, and it also is hard to color match with almost anything else. In the end, I decided to match it with black, which works color-wise, and matches the season.
Looking for inspiration, I gravitated towards the late 19th century, and eventually settled on this rough design. It’s got the right mix between black and contrast fabric, looks really cool, and somehow just suits the fabric. I did decide to not put any white lace on my version, as it wouldn’t quite work with the color I’m using.
Source: Withaker auction
The first part was the skirt! I used the Truly Victorian Ripple skirt pattern, with the slight modifications I made for my green 1890’s skirt. For this version, I kept things simple. It has no lining, as the fabric already has a lot of body on it’s own. I did add pockets, as those are obviously an essential. I chose to serge the edges, as the fabric does fray quite a bit. I got a serger about a year ago, and although not historically accurate, it does make for a nice clean and quick finish.
I changed the opening to the center back, and after pleating the waistband I put in the inner ties to keep the pleats towards the back. Adding those and trying it on over my petticoat already made a huge difference!
Without petticoat and ties, pleats pinned in place
With petticoats and waistband
Then it was hemming time. I ended up just using a small strip of white bias tape. TV patterns are always a bit short on me (even if I add 2-3cm to the pattern I often end up with just 1cm of extra hem length, even though a hem should be included in the pattern). This means I basically need a facing, rather than a double turned hem. I didn’t want to go through the trouble of doing a full self-bias cut strips as hem, so I used white bias tape. The petticoats underneath will be white anyway, so I figured white would suit. I finished this by hand, as I do prefer an invisible hem. It takes a bit of time given that this skirt pattern has a 5m hem circumference, but it’s worth it I think.
White bias tape as hem
Hem from the outside
Final step was the closures! It closes center back, with additional snaps to close the slit.
In my last post I mentioned my ‘next’ project was already done, so the post shouldn’t be too long. I actually started writing this in March, but then life took over, so here we are I guess? The good news is that this time too, the project after this is already finished, and actually, so is the one after that. So hopefully the next post won’t be another 5 months!
To make up for the wait, let’s start with a pretty picture of the final result!
Back last summer, I visited San Francisco and met up with Noelle from Costuming Drama for a day of fabric shopping. She kindly showed me around, and I ended up buying fabric for two summer dresses, and a whole bunch of lace. This lace was pretty, quite wide, and discounted, which resulted in me buying the bulk. It came in roughly 2.5m long pieces, and the seller it probably came from a lingerie company originally.
From the moment I got it, I thought it’d be perfect for something frothy and Edwardian. Lace is such a big thing in this era, but it can be difficult to find enough pieces large enough and of fine enough quality to actually make something nice. This was perfect, and so the Edwardian lace ball gown idea was born. I spent quite a bit of time in a fabric shop back home to find the perfect color to back the lace. I ended up going with a gold-brown sandy color. Enough contrast to make the lace pop a bit (on a lighter fabric it either disappeared, or just looked yellow), but not enough to take away from the ‘lacy-floof’ Edwardian look. I also got some gold ribbon as potential contrast, but decided against using that in the end.
Last January, I had an Edwardian weekend away, and I figured it’d be the perfect occasion to actually make the dress. I ended up starting way later than planned (I had about a month, while I usually prefer more like 3), but I’m really happy I got it done in time.
The skirt basically consists of 3 layers. There’s a (poly) satin under-layer (flatlined to a white cotton for strength), a tulle over layer which is completely separate from the base, and the lace is stitched on top of the tulle. My goal was to make the lace ‘flowy’, and move almost separately from the underskirt. The underskirt is a ‘standard’ gored Edwardian pattern based on a tiny pattern picture from the 1905 Gracieuse.
Cutting the cotton flatliningCutting the brown satinPlaying with layers
The tulle layer is basically the circle skirt version of the base skirt. This means it has a bit less ‘shape’ and doesn’t quite do the same flair. This also means I didn’t have to seam any tulle, and the lace could be attached in circles as well.
The tulle layer, basically a circle skirt.
The lace flounces were planned out to take advantage of the height of the lace as well I could while still allowing for some overlap. I ended up gathering the lace a bit more tightly in the back sections, especially for the upper tiers. This means it’s not quite so ‘puffy’ around the top hips, but more so in the back.
Building the layers. Starting at top & bottom to work out the spacingThe lace is attached only to the tulle layerPutting it together. The lace is gathered more closely at the back (right in the picture) than the front (left).
For the bodice I spent some time looking for inspiration pictures in the 1905 Gracieuse, and selected a whole bunch of images that could work.
Eventually, I settled on this one:
I made the base bodice following the rough patterning from the Victorian Dressmaker book (the 1905 white gown). I adapted a late-victorian Truly Victorian pattern to have a bit of the ‘floof’ for the more pigeon breast look. I flatlined the base of the bodice with lace, and then constructed in the regular way. The lace is seamed at the top as it wasn’t quite high enough otherwise, but I positioned the seam so they’ll be covered by the overlay later.
Flatlining the piecesThe main bodice constructed, seen from the frontMain bodice construction from the back
The top was decorated with a flounce, which is slightly pinched up in the centre. I ended up actually not flatlining the sleeves, and that contrast was quite nice.
Adding the flounce. The neckline was finished laterThe bodice closes with hooks & barsPlaying with ribbons.
Although the full-lace bodice was nice, adding the ribbons and bows from the inspiration image really made it come to life. Lace is nice, but it became a little bit of a beige blob with no contrast. The bows and ribbons are just enough to break it up a bit. I made the bows out of the satin I used as base layer, so they match nicely in color, but still contrast enough to pop a bit.
Finally, I made a belt by gathering satin on top of a canvas base and stitching it in place. The belt, too, made a big difference in the final look. Creating a visual separation between top and bottom really helps to highlight the hourglass shape.
The finished frontThe finished backA close-up of one of the bows
So, time for some final pictures! I felt very floofy wearing this dress, and it’s a lot of fun. The design is in many ways rather simple, but the lace adds a lot of interest so that it really doesn’t need more details than it has. I’m not fully convinced beige is my color, but with the bits of contrast fabric and pretty materials I really like how it came out.
I’ve by now actually worn this twice (the only advantage of being late in writing this), and it was fun to bring out to castle d’Ursel for a ball. There was actually a vintage photo background present, so of course I had to take advantage!
Hello readers, it’s been a while! Some sewing has happened since my last post, but no historical projects were actually finished, hence the lack of updates. However, in December I finially got around to some historical projects again, this time with a deadline. So sewing ensued, and stuff has been completed. (And of course, after that it took a little while to actually write the post).
I had an Edwardian weekend away with friends end of January, for which I aimed to make two things. Firstly, a black wool walking skirt for practical purposes. Secondly a lacy ball-gown. More about that one later, this post is about the wool skirt!
The black wool skirt was a practical choice. I wanted something that would be suitable for colder months, and which would match with a lot of different things. From sporting sweaters to blouses to bodices, in many different possible colors. Something like that didn’t really exist in my wardrobe yet.
I started by looking through the online Gracieuse archives. I picked 1905 as a year, and browsed through collecting the images which included a pattern reference. I wanted something walking length and simple that wouldn’t be too difficult to make. However, also something with visual interest somewhere, as a plain black skirt can also get too plain easily.
In the end, I settled on this design from the october 1905 edition. It is described as a ‘foot free costume skirt with pleated accent’. It has two pleated panels on the side for visual interest, and I figured I could also add some in-seam piping on the panel above the pleats. The skirt pattern is, as usual with de Gracieuse, absolutely tiny. However, it was enough to get basic shapes/proportions and to start a skirt draft.
My first step was to transfer the general style lines of the skirt patter to a grid, and to convert it to something that had the right length for me. Waist size was a little less important, mostly because there’s pleats in the back. But I did measure roughly how wide I wanted the front to be on me, and attempted to stick to that.
Honestly, there was no super clear method to this. I started mostly figuring out the length, angle of the circle, and waist measurement before pleating the back. And then I drew something which looked visually sort of similar, trying to retain the angles. I also decided I’d do the pleated panel last, based on the size of the ‘gap’ to fill in.
Drafting the full scale version was one of those moments where a big floor came in handy!
In the end, I think all my panels came out wider than in the inspiration, including the pleats. I had 4 pleats instead of 4, and my pattern for that piece was much more rectangular than the more square you see in the original. I don’t hate it, but it does mean the skirt has a slight tendency to ‘swing foreward’ a bit? I might experiment with inner ties to keep the pleats to the back a bit more.
Then it was time to cut! I got a black faux wool for this project. It’s fairly heavy, which I did want for this skirt. 100% wool is a bit harder to find around here, and there was enough of a price difference that I opted for a ‘good fake’ instead. That also made me feel a bit better about not making a mock up.
I piped the seams next to the top side panels with pre-made piping (another short-cut, as making piping out of wool is a pain, and I had a deadline). I next pleated the side bottom panel, and with a bit of fiddling and figuring out managed to attach that on 3 sides. To the front/back it’s seamed under a pleat to the front/back panels. Not actually in the pleating line itself, which would have been much easier and probably better, but I didn’t take that into account when patterning, so I managed.
At the top, I folded over the side top panel, laid the pleats underneath and then top stitched about 2mm from the edge. This actually gives a bit of a ‘fake piping’ effect because of the springy wool, which I was quite happy with.
The pleated panel was hemmed with bias tape before pleating, because I wanted to make sure the hem would hold the pleats as well. I eventually ended up just hemming the whole thing with bias tape. A wider cotton facing would probably be more accurate and better protect the hem, but in this case I don’t worry too much about that and just wanted a simple finish.
Final steps were to pleat the back, and attach the whole thing to a waistband. The rest of the skirt hemming was actually done then, and finally closures made it complete!
Some pictures on the dummy in my messy room
And some on me! Paired here with a cycling sweater by Emmy design, it makes for a great winter outfit. It’s warm, a practical length, can be paired with nearly everything and yet the pleats add a little interest. I was very happy to have a bit of snow for the perfect picture setting, thanks to Niklas @vintagebursche for these photos!
It’s January, so time for the annual re-cap of the last year! I always like these re-caps because they typically show that I did more than I thought. The big projects always take over a bit in my mind, but with all the ‘smaller’ things the work adds up!
I started the year finishing some 1830’s accessories. I started the bonnet at the end of 2020, and finished the covering and trimming. The pelerine was actually started before I finished my gold 1830’s dress as I wanted to know how much fabric I had left. I left it just cut and not sewn, as I didn’t need it at that time. I finished it over the holidays, and although I haven’t worn it yet, it is nice to have another option to play with when wearing 1830’s things!
Next up were two other unfinished projects. These two dresses got thrown into the ‘naughty-basket’ at some point, and I finally took time to take them out again. The first is a winter dress with a lovely fabric of 17th century skaters on it. The other one is a 1940’s model I was happy to finally finish.
My next project was a quick, unplanned one. I joined in filming for a TV series in Febuary (it will actually start airing next week!). However, based on pictures they choose for me to wear my dark green ball gown, even though it was freezing that week, and it should be around 0 Celcius on the day of filming. Cue: me sewing a bodice in a weekend. I had enough fabric left to make something with a high collar and long sleeves to wear, which would actually work with extra warm layers underneath. The plus side: we got some very nice pictures in the snow when I finished it!
After this quick project, I went back to the other thing I had been working on, which was a late 1900’s vest to match my split skirt. This was a real tailoring project, the first time using canvas interfacing or pad stitching, and I’m still really happy with how it turned out. It took quite a bit of time for a ‘simple’ garment, but it was a lot of fun to learn new stuff. I finished it just in time for a photoshoot, so thanks to Martijn van Huffelen for the pictures!
Then, in April, I joined as a pattern tester for the Selina blouse from Scroop Patterns. I’d had this pale blue fabric for a while with exactly such a blouse in mind, so it was nice timing. I haven’t worn this as much as I probably should, perhaps there’ll be some 1910’s events in the future to wear it also in a more historical setting?
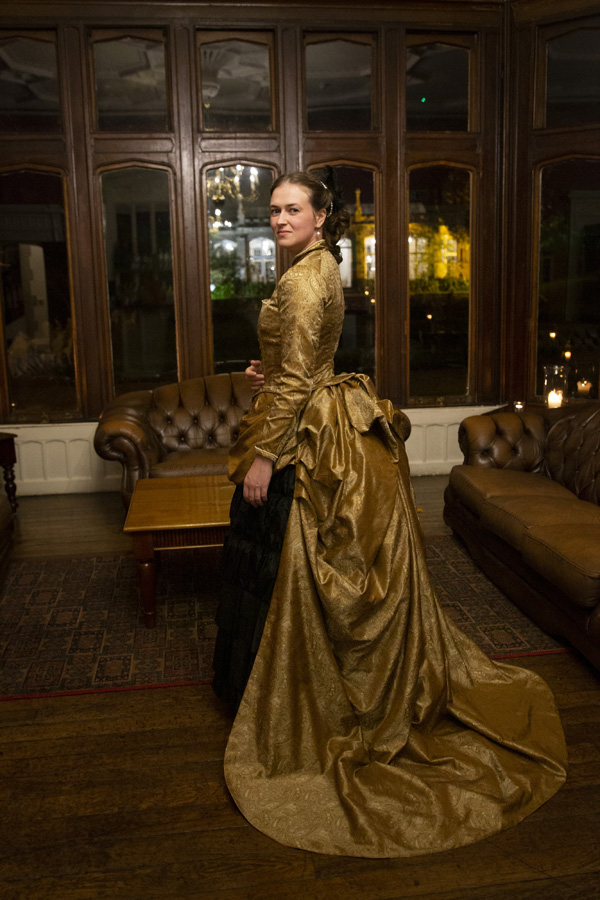
After a spring of small projects, it was time for the long-term again. I had an event in October, and although I didn’t absolutely need a new dress, it was the perfect timing to finally use a gorgeous gold silk I’d had for a couple of years. I worked on this project for about four months, to make an underskirt, overskirt, train and two bodices. I really love how this fabric flows, and I loved wearing both the evening and the ball version.
The weekend before this same event, I decided to try to churn out a morning gown as well. It was an event with sleep-over, and there’s nothing better than a simple flowly gown for fancy breakfasts. I got this beautiful hand-print fabric from an Indian shop a bit before, and it made for a beautiful flowy gown. I might still go back and add some trim to this at some point, but I loved lounging around in it already.
Throughout the entire year, the thing I probably worked on most was actually not something historical, and not something for myself. In November 2020, I started on the wedding dress for my sister-in-law. This was such a lovely thing to work on. There were a lot of new things from me, from the tulle skirts to the mesh overlay on the bodice and the little pieces of lace. I took my time on this one, and finished it about 2 weeks before the wedding without needing to rush. It’s definitely one of the most neatly finished things I ever made, and one of the most special projects I’ve done. There’s posts on the skirt, bodice, lace, and the finished thing for who’s interested.
After the two big projects I finished in October, I took a little break. In November, I started sewing again and I made a second version of the split skirt, this time in black wool. This was a relatively simple project (I’d already made one before, which always helps), and something I think I’ll really enjoy wearing in daily life situations as well.
And that was it for finished projects in 2021!
Looking at what I planned at the beginning of the year, most of the concrete plans got done (there weren’t that many: the 1830s accessories, modern dresses, 1890s vest and wedding dress). The main thing which didn’t get finished are the hand-sewn 18th century stays. I did work on them, and I’m practically finished with the boning channels now, but I’ve been delaying the next step. I also didn’t do any of the ‘maybe’s’ I put in that post, but instead I did make the gold/black gown, which had also been on the wishlist for a while. And I made an 1890s bodice, a 1910’s blouse, a 1890’s wrapper and 1900 split skirt, none of which were planned. All in all it was a pretty good sewing year, especially considering the time that went into the wedding dress!
The last project of 2021 for me was a split skirt. I made a pair early in 2020, and after the gold bustle and wedding dress I was looking for a project which would need a little less figuring out. The great thing about making something a second time, is that you already have a finished version to look at when things get confusing. It also didn’t need a mock-up, which definitely speeds up the process.
The pattern is Truly Victorian TV299.
This version was made out of black wool. It’s just a little heavier than the wool I used for my brown version, so I chose not to line this one. It’s also wool which doesn’t fray, so no seam finishes necessary!
I got 3,5m of fabric for this project, as that’s what the pattern calls for. However, when laying out the pattern, I could get it out of more like 2m of 150cm wide fabric. It required a little piecing of the back panel, as that’s wider than 75cm (half the fabric width). However, this piecing is on the inner leg, so it’s nearly invisible when worn, and it was worth saving fabric for me. So if you’re looking at this pattern but want to save on fabric, it’s definitely possible, especially with the 1,5m width. I believe mine is a size D. Below is a picture of the pattern lay-out.
The pattern starts with pressing pleats. There’s few things as satisfying, nor as difficult to take pictures of, as pleats in black wool.
This pattern doesn’t include pockets. What looks like the pocket openings are actually the opening for the front fall closure. I’ve worn my 18th century separate pockets with my other split skirt, and that does work. So I decided to sew in similar pockets into the waistband for this skirt! I basically made 18th-century style pocket bags, and attached those such that the opening would be aligned with the fall front opening.
They don’t fit really large items, as that will show bulk under the fairly tight upper part of the split skirt. However, it’s definitely good to have the option to carry things!
I found beautiful buttons for the front, but the store didn’t quite have enough to also put buttons on the pocket flaps, as called for. So I decided to use some decorative stitching on the pockets instead, and close them with hooks. They have a hook middle center, and a snap at the bottom. However, there’s a little bit of gaping at the top right now, so I do want to back and add another hook between the middle and the top.
The pattern calls for doing the button holes very early on, but with the bicycle length the lowest button hole and button get in the way of hemming. So this time, I left off the bottom button until the end. At that point I decided I didn’t really need it any way, so I just left it off entirely.
It’s quite difficult to take pictures of the skirt, as the wool absorbs the light, but I tried! I’m wearing my Emmy Design cycling sweater, which goes perfectly with it. I’m looking forward to wearing this for both historical and daily stuff!