
The term ‘historical accuracy’ is often found in historical costuming. It’s that elusive ‘getting it exactly right’ in making historical clothing. Making something which a contemporary wouldn’t be able to distinguish from their own wardrobe, even on close inspection.
Of course, there’s a lot of different levels of historical accuracy, and often the ultimate goal is not to get it right at all costs. Money, skill and time can all effect how far you wish to go, and there’s nothing wrong with just wanting to make a pretty dress! I’ve personally never tried to make anything 100% accurate, but I do always like to know when I’m deviating from history.
But it can be difficult to find out what’s ‘right’ and ‘wrong’ when you’re just starting out. There are a lot of different aspects to it, and a lot of information in different places. So I thought I’d try to give an overview of what to pay attention to, and how it applies to dresses from ca. 1805-1820. A little disclaimer: all of the info below is from my own experience of looking at and reading about historical clothing. If there’s any ‘mistakes’ or nuances I’m missing I’d love to know!
Fabrics
The fabrics of existent dresses are most often silk or cotton. Wool and (fine-woven) linen are also seen. Although cotton and silk are seen more often, it is good to remember that the fancy dresses are also the ones most likely to survive and be preserved. It’s very probable that ‘back in the day’, cotton and especially wool was more common than museum collections might suggest. Anything which has a synthetic fiber, viscose, rayon or polyester, is not historically correct, as these weren’t invented yet. For silks and cottons, look for thinner fabrics. Very thin white cotton was often used. Heavier draped fabrics aren’t seen much. Silks are usually either satin or taffeta, but again, rather thin. Crepe silk was also used, very thin and and almost sheer. The examples of crepe I’ve seen aren’t shiny, and have a different look than modern chiffon. Dupion silk is very modern, the ‘slubs’ in the fabric weren’t appreciated. If you have a very smooth dupion you might get away with it. Silk velvet is also seen sometimes, though a bit too heavy for evening wear.
‘Back in the day’ the term ‘muslin’ was used for the very fine cotton. Be aware that modern ‘muslin’ doesn’t refer to the same fabric, it’s a lot heavier. Terminology can change over time (to make it easy on us…). A similar thing holds for the term taffeta, which is often used to refer to poly taffeta. The historical variant is always pure silk. Also, be aware that ‘velvet’ and ‘satin’ refer to the way in which a fabric is made, not the fiber content. Historically, these would’ve mostly been silk or sometimes wool. Velvet nowadays is usually cotton, polyester, or a silk/polyester mix. The last one is usually referred to as silk velvet, so be aware that it’s usually not 100% silk!
Left is dupion silk. With a lot of texture, which wasn’t used. Middle is silk taffeta, with a smooth surface and crisp texture. Right is silk satin, shiny, with a drapey texture. Taffeta and satin are correct, taffeta being the more common choice.

Fabrics in those days were often narrower than modern fabrics, which can have effects for how for instance skirt panels were cut. This also means they could use the selvage sides of narrower fabrics more often than we can. It’s nearly impossible to find historical-width fabrics nowadays though, so don’t feel bad for not using them.
If you are going for a non-historical fabric (silk is expensive…), you can always try to find something which has the look/feel of the real thing. My white/red regency dress is made of a cotton/polyester mix, but it looks and drapes quite similar to satin. It won’t pass close inspection, but it’s a lot better than my first regency dress, which was made of floral upholstery fabric. Really lovely, but way too heavy and roughly woven for the time period.
Left: wrong fabric (upholstery cotton), too heavy and too roughly woven (never mind the floral, also not completely right). Right: still wrong fabric (cotton/poly mix), but in looks way closer to something historical (satin), so you have to look closely to see it.
")

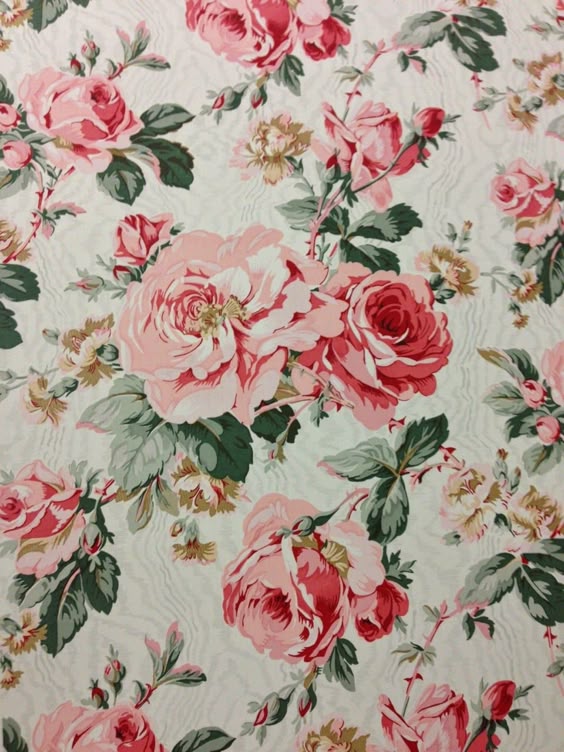
Fabrics could be plain, patterned or embroidered. You get stripes, checkers and dot patterns, stripes being the most common. Flowers are also often seen, but you have to be careful with modern flower patterns! Generally, flower patterns were a left-over from the 18th century so you see them most often in the early regency. Anytime after 1810 it’d be old fashioned. A very fashionable lady wouldn’t have a printed flower fabric, but a rural lady re-using old fabric might. Flowers in those times were also often stylized, and the more modern ‘English rose’ type of flowers didn’t exist yet.
On the left, a very modern flower. Not regency at all. On the right flowered prints from actual dresses.
Color-wise, nearly everything goes. Be aware though, that very bright colors usually need chemical dyes which weren’t invented yet. Bright emerald green or hot pink/purple didn’t exist. White/ivory/beige/blush were very popular, but definitely not exclusive!
Shades of white:

Some decidedly non-white examples:

Full lace dresses also existed, though due to the fragility of the fabric not a lot have lasted. This is usually silk blonde-lace.
Cut
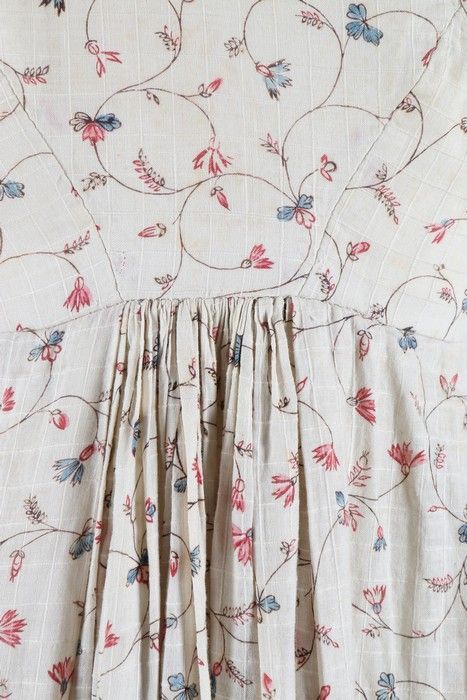
The next thing to look at is cut. With this I mean the shape of the pattern pieces. Regency bodices had a very specific cut to the back of the bodices. The shoulder seam was to the back of the natural shoulder, and the center-back panel was very narrow in the middle.
This picture clearly shows the seam lines. The diamond-shaped back panel, the side panels extending towards the back and the front panel extending towards the back. The sleeves are also set very far to the back.

For the skirts a relatively simple pattern was used. Generally speaking, there were either 2 rectangles (one for the front, one wider one for the back, gathered mid-back), or a combination of rectangles (front/back) and triangles (sides). The further along in the regency, the more common the rectangle/triangle shape became. This gives more of a flared skirt. Skirts were always gathered at the back to the bodice. Sometimes they were gathered all the way round, sometimes from the sides to the back, sometimes only in the very center of the back.
Two examples from (http://www.19thus.com/WomensClothing/) show the shapes. As you can see, sometimes multiple panels were used (could be due to smaller fabric width), and the triangles often cut together with the rectangles.

Sleeves were either short (halfway upper arm-ish) or long (to the hand or even a bit longer). I’ve never seen elbow-length sleeves. Short sleeves were sometimes fitted in the early Regency, but became more universally puffed later on, even though many versions existed. Long sleeves are either fitted all the way, with a little gathering at the top and fitted at the bottom, a puffed sleeve with a longer fitted one attached or little puffs all the way down. Longer sleeves were more common for day-wear and short for evening-wear, but it was mixed up as well. Dresses practically always had sleeves! Sometimes a sleeveless over-dress was worn, but these wouldn’t usually be worn on their own. Shoulders almost never showed.
Top row left-right: A fitted sleeve, a puff sleeve with lower sleeve, the little puffs all the way down (not very common, but very typical for the period), a wide sleeve at the top becoming narrow near the bottom – this is later Regency and would become more popular in the 1820’s and 1830’s, and a straight sleeve with wider top.
Bottom row left – right: The classical puffed sleeve, a straight short sleeve and example of a sleeveless over-dress.

Waistlines were high, right underneath the bust. Around 1820, the waistline starts to lower a bit, but is still well above the natural waistline. Necklines are generally low, but there’s a lot of variation here. Remember that square low necklines were also sometimes filled in with a chemisette. This is the common way to get coverage, full dresses with a neckline right underneath the chin are very rare. Very low necklines did happen often, although it might depend a bit on class and country (high-born French ladies being more risque than say, lower-class English).
Some portraits showing the point for the neckline to sit. The top-row ladies all wear chemisettes in different types to cover up (yes, they’re often transparant, covering up is relative..). The bottom row are some of the lower necklines I could find. Notice though, how even the ladies in the top row have very low necklines on their dresses. Just above the mid-bust point was very common. Remember, in these days ankles were considered decidedly more sexy than cleavage.

The portrait on the bottom right and top middle also show the bust-shape really well. The chest was pushed up by stays, and separated. The fashionable shape wasn’t pushed up and pushed together, as modern push-up bras tend to do.
Finishings
The sewing-machine was invented in the 1850’s, so all dresses during the Regency were sewn by hand. This means a fully historically correct dress is sewn entirely by hand. Many people also ‘cheat’ for the inside (invisible) seams, but hand-sew the visible parts, such as on the hem. If you want to be totally correct, also keep in mind the ‘natural fibers’ for sewing thread and don’t use polyester threads.
Generally, bodices were lined (most often in cotton or linen), skirts were usually unlined. As far as I could find out from pictures, bodice linings were often constructed separately and put in raw-edges facing each other. The lining was then stitched in place along the main seams. The outer-fabric bodice edges were turned over inside and stitched to the lining to keep them in place. (So no stitching the lining to the bodice neckline right sides together and then turning them inside-out). (If anyone has more info on construction techniques I’d love to know)
A picture showing the lining of a dress and the stitches keeping it in place. You can see the sleeves were attached after the bodice lining.

Dresses closed in a myriad of ways, but some methods were more common than other. By far the most common method was using drawstrings in the neckline and waistline to close in the back. Gowns closing in the front used a combination of drawstrings and pins to close. Buttons down the back existed, but were pretty rare. (Fabric covered buttons are most common). Hooks and eyes were probably also used, and occasionally lacing is seen. Be aware that metal eyelets didn’t exist yet, the eyelets would always be hand-sewn.
At the top two examples of laces tying shut. On the right an example of a front closing dress, the lining closing with lacing the rest with tapes and pins. At the bottom three less common examples. Lacing, buttons and hooks and eyes.

Trim on regency dresses is relatively rare. Ribbon was often used, put around the waistline, but I suspect also used separately from the dress. You see it more often in portraits than in existing dresses. Embroidery is one the most common decoration methods. A lot of trims are also made of the same fabric as the dress. Piping is sometimes used in sleeve decorations, but not really seen anywhere else. Lace is sometimes used as edging around the neckline and/or sleeves. Later in the regency, fabric ‘tubes’ are also used to create designs. Generally speaking, later in the regency the emphasis on the hemline grows stronger and with it grows the amount of trim on the hem. Always be aware of modern ready-made trims, most of them are not very fitting. If in doubt, look for images of dresses and see if you find anything similar.
At the top 3 examples where all trim is embroidered on. A the bottom from left to right: self-made trim, lace, and fabric tubes.


I’m gathering my resources, my information, and my courage to attempt my very first Regency gown. This is a wonderful resource – chockfull of VERY helpful information!
Thank you! I was at that stage once, and I’m very glad it’s helpful. Good luck on your project!
Very interesting and well done with the interior construction pictures . So many things to consider when recreating period garments. Thank you!
Thanks for compiling this info! I just wanted to add a few things about textiles, if you don’t mind: many of the dresses that survive are cotton and silk because they may have been special occasion dresses or belonged to women that had large wardrobes so they didn’t see a lot of wear; cotton had not quite yet become the ubiquitous utility fabric that it was in the mid-19th century and later, so a lot of everyday dresses were probably made of wool (especially in Europe where cotton was an import). Also, as you say, satin and velvet are weave structures not fibers, and both wool satin and wool velvet existed historically (though are very difficult to find today!). Hope that is interesting and helpful!
You’re welcome, and thank you for the info! I’ll add a bit the ‘what survived’ vs. the ‘what was common’ fabrics.
Great summary for beginners, indeed. I think my only sources for insides / construction are costumers’ blogs about their recreations, and even an overview like this is hard to find… certainly also something I would have loved to have at the beginning!
I would add a couple of things I’ve observed myself. Firstly, that you can find elbow-length sleeves on dresses with the empire line – they’re just most often 1790s dresses rather than early 19th century (so outside your stated era, but they can be stylistically very similar otherwise). It’s also in this earlier era you most often find skirts gathered all around. The progression of time often also shows – not quite absolutely, but it’s a nice overall guide that could be helpful for recreations if you’re aiming for a specific year – in the shape of the back in combination with sleeves: earlier dresses have the “diamond” centre back piece narrower with the sleeves set in towards the centre back still kind of 18th-century-style, whereas later on, let’s say 1810s and especially later 1810s, together with the gradually dropping waist and more trim you also get beginnings of the sloping shoulder look of the later decades. You can see and compare it nicely in the bottom left and centre dresses in your second-to-last picture.
I’d also add eyelet whitework embroidery as possible trimming; done in the fine muslin of the dress…
I’ve seen such a dress (I think it was dated 1816 or thereabouts?) that also had hooks and eyes in combination with a drawstring, basically hooks and eyes in the same places where the drawstrings were (neckline and waistline), which seems to be exactly what’s happening with your example here as well.
You often also find figured silk (brocade), but that, I suspect, is even more difficult to find in a period-appropriate pattern nowadays than flower-printed cotton is. 😛
Aaand… I don’t know if you still remember where you found all those pictures, but I think this would be even more helpful if it contained sources / links to museum sites. Because I’m intrigued by that bottom left dress in the second-to-last picture, and would love to see more of it. 😀
Thank you!
I think the progression/changes in style over time are definitely a good point. I’ve tried to keep it a bit concise for this article, so I think it’d be too much info to add, but it might be a good idea for a future post! :). Your general points are definitely very useful.
I’m afraid the credit of the pictures is pure laziness on my side (sorry!). I had to re-size & re-cut all the images and didn’t bother copying all the links. I tend to collect images from my own pinterest boards though, which do usually refer back to the original source (or at least the webpage I got them from). The board is here: https://nl.pinterest.com/saulemiorta/historical-clothing-regency/ . The dress you’re referring to is seen in full here: https://nl.pinterest.com/pin/31666003603336696/ . It’s from the Rijksmuseum, but they seem to have removed the inventory page when re-doing their website, because it can’t be found on there anymore. So no images from the front unfortunately.
Still helpful! Thank you!
An excellent piece! Thank you for distilling the basics so nicely.
I really, thoroughly enjoyed this post. Thank you!
Thank you, you’re very welcome!
Hello! I had a lovely time reading this article which I found very informative and ressourceful. I’m planning on sewing myself a Regency-era gown this year, and am trying to figure out which pattern would suit my shape best. I’d love your opinion – I am someone with quite a large bust, I was thinking a gown closing at the front, with additional drawstrings and the “bib” being pinned overtop of the front closure. Would you think it’d make for a more flattering dress, as the bust may be better “held” by the dress, and there’d be more fabric holding it in place, rather than using the simpler drawstring-tying-at-the-back method, which I’d imagine would be easier to sew? Or would the undergarments hold the bust enough so as to be able to use either sewing pattern? Thank you!
Hi, sorry for the late reply, for some reason I didn’t see your comment before. Your undergarments should really support you sufficiently, without any more support being needed by the dress itself. I do think drawstring dresses are a good choice especially for a fuller bust, Sense and Sensibility has a drawstring dress pattern I personally quite liked. The only change when I made it for/with a friend was to make the neckline a bit lower, as it is a bit high.
Hi! I am so late to this so it may be of no help at all, BUT… stays were often used to give the bust area some lift and extra support, this photo shows a regency undergarments design that would be helpful, https://nl.pinterest.com/pin/378302437454621411/ . I think that would’ve been the most effective form of breast support back then and now when it comes to historically accurate clothing and undergarments. It would be a little bit more work to make but that would add the extra support without having to worry about putting extra stress on the dress itself. Hope this helps…:)
Thankyou so much for describing the pattern pieces. I’ve been after the information on high waistline construction for many searches. Also skirt construction that doesn’t involve a full circle bias cut. Time consuming on all levels from cutting to hemming. One question I have is if the back is diamond cut how do you cut the.sleeve top?