
Since I’ve been looking into the making of my red/white dress again (yes, it’s going to happen someday!), I’ve been researching the construction methods a bit more. Specifically, I’m looking at front-closing gowns with a v-shaped neckline. I believe there’s different names out there, such as cross-over gown, wrap front gown, apron gown, bib front gown and drop-front gown. All of these names are used somewhat interchangeably for gowns which close in the front, although they all have their own characteristics as well.
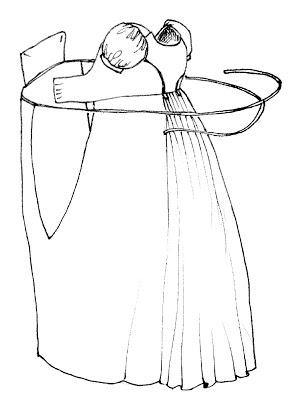
The dress which started my search has a deep v-shaped neckline and slit on the left hand side (ca. 1810 – 1820)

To start with, some terminology and what I believe they commonly refer to.
The term ‘bib front gown’ is used most, and is usually used to refer to those dresses where the front of the bodice is attached to the front of the skirt, but not to the side pieces. It has slits on either side, and is shut by pinning the bodice front onto the lining front (which is attached to the side bodice pieces), and tying strings around the body. These dresses could have both a straight square or a v shape neckline, although the former seems to be much more common. One great diagram (by the Hungarican Chick) of a bib dress is below. In this case, pictures are always much clearer to me than trying to describe it! (She has more great articles, including on stays, so if you’re interested, go check out her blog!)

I believe the apron-front and drop-front gown are just alternative terms for the bib front.
The cross-over, or wrap front dress is slightly different in that the front bodice panels are attached to the side bodice panels, but not to each-other. This always gives the v shaped neckline. The skirt has a slit on one side (the side which crosses over) and is attached to the bodice front, or it has slits on 2 sides and is loose from the bodice and closes with ties. The first picture in this post is an example of a cross-over front dress (with one slit in the skirt).
The problem with these gowns is that when you start looking for extant examples, you find many different variations in bodice styles, where the skirt is attached and how the skirts close. I recently asked about these cross-over/bib front dresses in a Facebook group on Regency sewing, and got a lot of different input from people on how they believed dresses were worn. There seem to be a lot of variations, and the discussion inspired me to try to give an overview of what the possibilities might be! This post is by no means meant as a complete study of how dresses were made, but just as an overview of the variations I’ve seen and how they seem to close. For now, I’ll focus on the front closing v-shaped neckline dresses ca. 1805 to 1815.
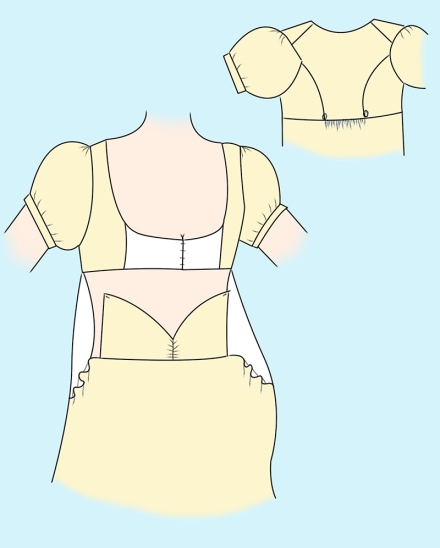
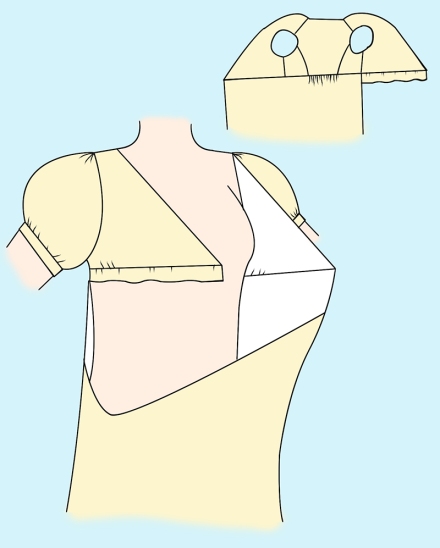
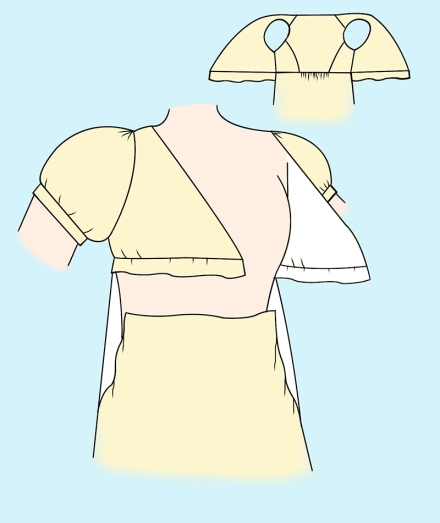
To start, I’ve tried to create some images of the 3 different types of gowns I want to focus on. From now on, I’ll name them ‘bib-front’ gown, ‘cross-over side-slit’ and ‘cross-over drop-front’ gown. Some schematics of the front and back view for these dresses, which I’ve colored for clarity. Blue is background, pinkish is skin (sorry for the nakedness, of course you’d be wearing a shift and stays beneath, but all the white would be confusing 😉 ), yellow would be the outer fabric of the dress and white the lining or inside of the outer fabric.
The bib-front gown (as also seen in the previous images):
The cross-over gown side-slit:
The cross-over gown with drop front:
These schematics show how the bodice and skirt are connected together to form both the v-neck shape and to have the closure in the front. The front-closure is particularly handy if you want to get into your gown by yourself. (I, for instance, am not able to close my blue dotted dress by myself, my arms won’t go that far back with the sleeves set so far in the back. I always need help to close the thing).
The question now, of course, is how you make sure the bodice stays crossed-over and the skirt stays up?
This was the question which inspired quite a lively discussion on the Facebook post I mentioned before. It seems clear that there’s some ties involved, and maybe some pinning. But where do the ties go? How are they attached? And is that enough, or do you still need pins somewhere? I’m afraid we didn’t reach a simple answer to this question, but there were a couple of good theories I’ll try to describe here.
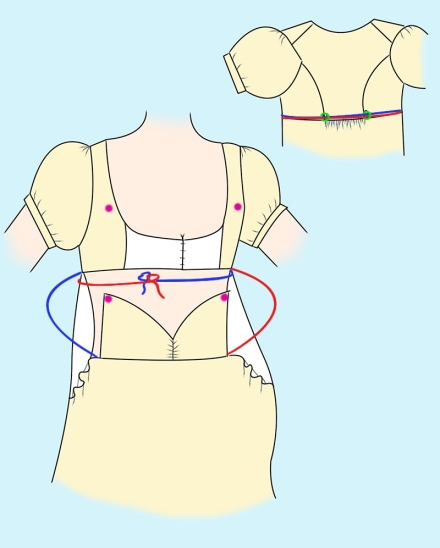
The easiest to answer is probably the bib-front gown, as this is the one most commonly re-created today. It closes with a combination of ties and pins. Specifically, there are 2 ties to each side of the skirt. These wrap around the gown to the back, (often through little loops where the back bodice connects with the skirt), and then close underneath the skirt panel. The bodice front stays up with either pins or buttons to the corners of the panel connected to the skirt.
Or, in a picture:
In this case blue and red are the left and right string. Green are the loops in the back keeping the strings in place. Pink are the spots the pins or buttons would connect to keep the bodice in place.
I believe this is the common way to wear a bib-front gown, I’ve never seen other versions. It becomes a bit more tricky with the cross-over models. In these cases, several options seem to exist.
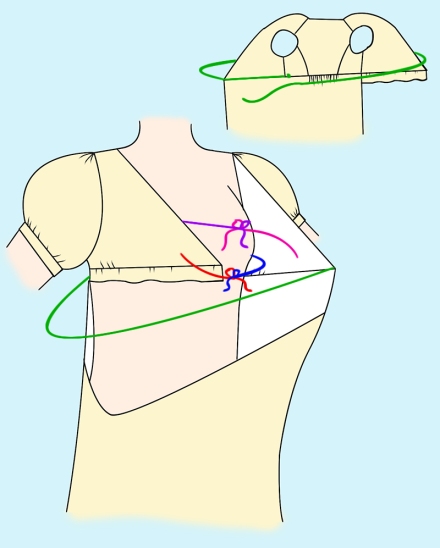
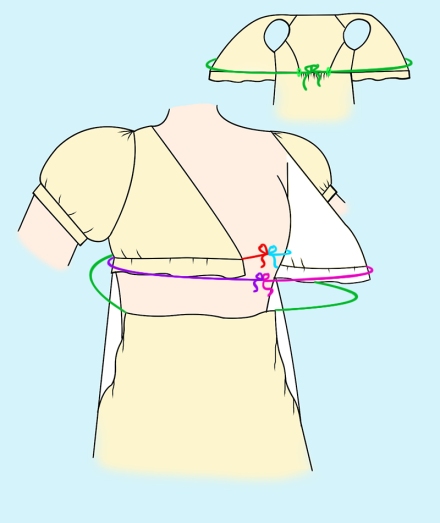
To start with the cross-over side-slit dress. For the position of the strings, I looked at the images of the interior of the dress I started this post with. They show several strings.
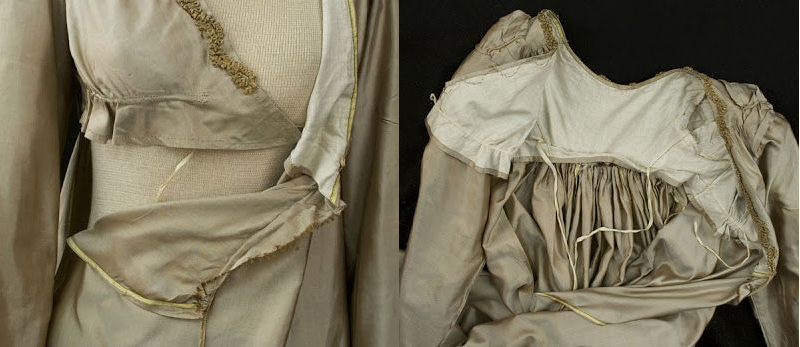
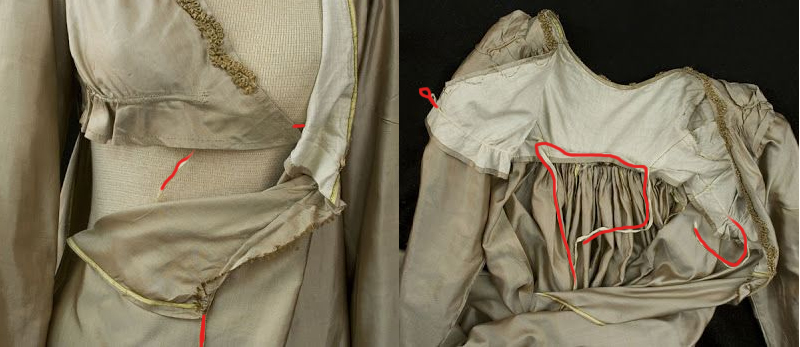
I’ve highlighted the strings I could find in red. Now my question was, what ties to what? Because I cound 1 loop and 4 strings. That’s 5 things, which doesn’t seem to add up. There’s a tie at the center-back lining, there’s a loop and a tie in both bodice panels, and there’s a tie on the edge of the skirt. The ties to the bodice are all plain, so appear to be tied invisibly somewhere. The tie on the skirt is a type of trim though, and looking at pictures of the back of the dress you can see it passing along the back.
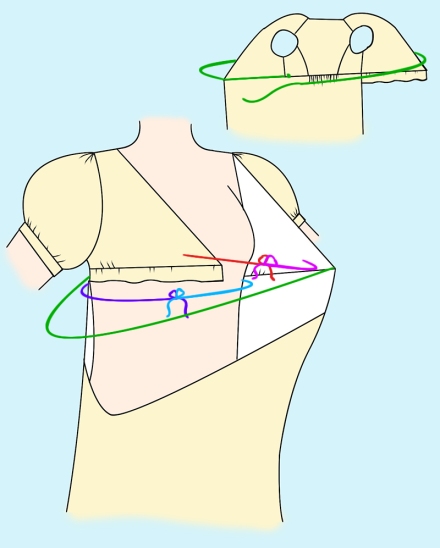
The general consensus after my blog bost was that the ties in the back would be tied in the front to stabalize the dress. The ties to the front panels would be tied to eachother (possible because they’re not at the very tip of the bodice). The tie to the skirt probably starts somewhere on the side panel. It then wraps around the back and would be pinned in place somewhere at the side panel where it started.
In a picture. The red and pink ties are attached to the inside of the bodice and tie to eachother. The purple and blue tie are sewn to the inside back panel and tie to eachother in the front. The green tie starts at the side of the dress and goes around to be pinned shut where the tie started. I haven’t been able to figure out if it is just pinned in place, or if there’s a slit or tie somewhere. The images of the existant dress don’t show this.
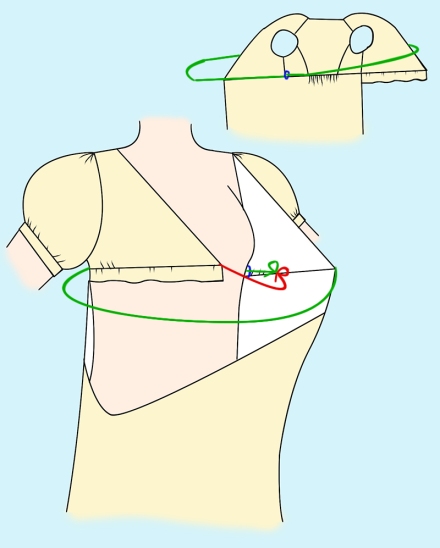
Another option I wondered about would be to tie the left-front tie to the right-back tie and the other way around. That would look something like this, the blue and purple ties again attaching in the back, the pink and red in the front lining. (the location is a bit awkward for clarification, they’d probably be tied in roughly the same spot.
So, are there other options? The above are based on 1 extant example, but one can imagine other possibilities. One would be that there was a string on the inside of the bodice not attached to the skirt (red in the above examples). If there were a slit on the side of the dress, the skirt tie could wrap around and attach to the bodice string on the inside throught the slit.
Something like this, with the red string attaching tot he bodice, the green wrapping around on the outside and attaching to the red throught the slit (blue) on the side. Just a disclamer, I’ve never seen an extant example like this, but it looks like a possibility. This could also be combined with two ties in the back (purple and blue in the first example) which would tie in the front.
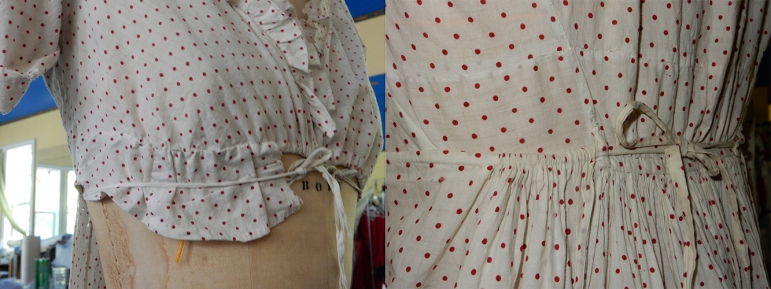
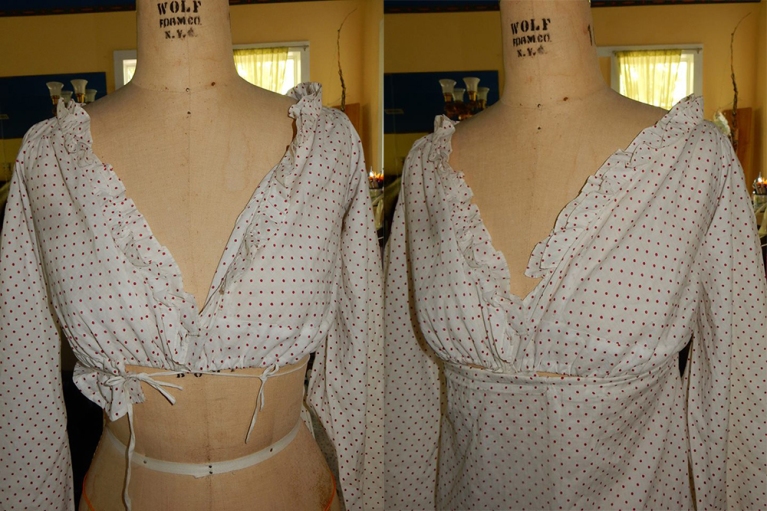
For the cross-over apron-front dress I found some input on the facebook group. One extant dress showed the ties and closure. Mackenzie Anderson Scholz kindly let me post her images here. She’s working on a pattern for Fig Leaf Patterns, hopefully out in fall 2016, based on this dress.
These images show how the ties from the front panels tie to the ties at the center back. Left front to right back and the other way around. The right image shows how the skirt closes in the center-back. The image below shows the front with and without skirt closed. You can see that there’s a little gapping going on at the front, which seems a common occurrence with this type of dress.
A shcematic. There are two ties to the front, red and pink. Then there’s two ties at the inside center back (blue & purple). The left front ties to the right back and the other way around. Then there are ties to either side to the skirt which tie around in the center back. There they’re held up by loops.
It seems all skirts of these type of dresses have ties which go around an tie in the back. The bodice might also just be held shut with pins though, without the ties.
Another problem with this type of dress is that the skirt panel falls down because it’s not really attached to the bodice front. For this, more pins might be a solution to keep it up.
To round up, something which also came up in the original discussion was that probably, women in the Regency era were also just doing whatever worked. You can’t see from a fashion-plate how a gown closes or a skirt stays up. Commercial dress-patterns were nonexistant and most front-closing dresses were made that way for practicality, so not for the highest classes. Many were also home sewn by women themselves, who were not necessarily dress-makers. This means that probably, everyone just fiddled along just as we do in trying to get it to work. (Some likely with more success than others). So fiddling around to make it work is period!
Finally, a little thank you for everyone who contributed to the original post on Facebook. If you recognize your own opinion here and would like credit, please let me know because I might’ve lost track of who said what.
I hope this post has offered a little insight on the possible options to close and wear these type of dresses. I’d be very interested in new insights on this, so if anyone has any ideas, or knows of extant examples which show different closures, I’d love to know!
Just as a closure, some commercial patterns of these type of gowns: (Let me know if I’m missing something)
Fig leaf patterns Apron-front gown (straight front, but could be adapted to a v-shape)
Sense & Sensibility Elegant lady’s closet (Cross-over gown)
Laughing moon 130 (Cross-over drop-front)
Laughing moon 126 (Bib-front, including v-neck option)
Period Impressions Bib-front gown

Pingback: Regency dress – Red & White bodice | Atelier Nostalgia
Hello,
This post is amazing!! I had been looking for explanations on how this kind of dresses fasten for so long! I have one particular gown in mind, which is in a Paris museum. I think it’s a bib-front dress, but I’m not 100% positive about it, and there’s only one (side) available photo of it. If you think you could have a look at it and let me know what you think about it, I’d love to send you the picture. You can contact me at maddy24@hotmail.fr. Thanks! – Elisabé (from France)
Thank you! I was looking for information as well myself, that’s how this post started ;). I’ve sent you a message. I wouldn’t call myself an expert, but definitely willing to take a look.